Introduction
Mistika Workflows have integrated support for Python programming language (Currently Python 3.11). This language provides bidirectional access to all the Workflows data structures, and most GUI actions are also available to python scripts. You can also create Python nodes very easily.
For advanced users It is recommended to learn these tools in order to achieve full automation for complex or repetitive workflows, and to get a more customized experience tailored to your needs.
This introduction chapter is intended for users with at least a basic python understanding (this is not a python course). However no python expertise is needed for basic Python usage, in fact it can be quite the opposite: Mistika Workflows is designed to hide a good part of the complexity of traditional Python programming, thanks to its ability to control flow execution via the node graphs, also offering a dedicated GUI with execution queues and full structured access to common media files and its metadata. Our ultimate objective is that the users will only need Python programming for very particular workflows not following common market standards, while Mistika Workflows will provide pre-built nodes for everything else. Additionally, SGO offers optional custom programming services on demand, for developing nodes to client specifications.
The python scripting tools are available in the Window->Panels->ScriptEditor. Normally each python script is stored (and executed) in a Python node, but a python interpreter is also provided.
Note: It is recommended to prepare one GUI layout for programmers with those tools and a different one for normal users. (You can do it with Window->Layout->Load / Save)
Note: The contextual menu has a function Contextual menu->Code update->Finder to node function to update them to the latest Python version (but logically this only works for official nodes coming with the software and not for custom implementations, which will require to be upgraded by their programmers)
Note: Some code examples on this manual are old and were originally written in Python 2.7, and may fail on current supported version (Python 3.11). However, the differences are minor and the Mistika related concepts have not changed (and this manual is not intended as a Python beginners tutorial anyway).
Script Editor
The next picture shows the sub panels of the Script Editor, and the typical iteration flow while developing new versions of your python nodes.

Alternatively, it is also common to go the other direction: To copy the code from the script editor to the code property for direct modification of the current node instance, and then use the Save In Library that is also available in the contextual menu of the node. Whatever suites you better on each occasion.
In addition to those actions, the python nodes have a contextual menu with options to refresh their python code by getting it from the official version of the node stored in the node library (Code Update -> Finder to node) or the opposite (Code Update -> Node to Finder)
These are the panels of the Script Editor, from top to down:
Python console output: The console on top of the command line will show execution output and potential errors (both for code executed in the command line or directly from the Python text editor)
Python command line (and syntax help): To execute Python command lines one by one, with auto-completion access to all the data structures available
The command line is also the best way to get help about the syntax of those Mistika classes: Whenever you start typing anything that could be matched to a Mistika class it will open a contextual menu automatically, which will show all the possible alternatives to complete the label (you can click on any of them to save typing the full syntax).
As we can see in the next example we have simply typed “tasks.” in the command line field, and all the possible functions starting with that prefix have appeared in the contextual list:

You can also use the command line to test interactions with the application (similar to the GUI interface). The following are some command line examples (you can also put them in your node scripts):
Python text editor: A text editor with support for Python syntax highlighting. Capable to execute the current script or just the selected code, directly from the editor. And with support multiple scripts, each one on its own tab (use the + icon to add more..).
Here you can freely develop Python scripts or code that you plan to insert into Python nodes later, execute it for testing, and save new nodes in the nodes library.
Provides a contextual menu with functions to execute selected code (or all the script), save/load scripts, and a SaveInLibrary function to save it to the nodes library (to create a new node).
When saving python code:
- The Load/Save menus can be used to save general purpose python scripts unrelated to any specific node. You can load them later and execute them from the script editor directly. The default place is the SCRIPTS folder of the project, and for general purpose scripts (not related to a specific project) it is suggested to use the folder SGO AppData/shared/scripts (but those are just suggestions by default, not mandatory).
- The SaveInLibrary action will save the python code under the SGO AppData/shared/workflowsLibrary, which will make it appear as a new python node in the nodes library. In principle it is intended to be used with python nodes (load a python node and rename it, then change the code and save in library)
IMPORTANT NOTE: The integrated text editor is very basic, and for complex scripts you will prefer to use an external text editor. If you do that, when you want to copy / paste Python code from external documents, if you plan further modifications it is highly recommended to paste it into the Script Editor panel, not directly into the Python code property of the node.
This is because the Code section of the Python node is not really a text editor, just a property container, and it may fail to deal with external formatting, custom indentations and other hidden codes embedded in the pasted text. Meanwhile the Script Editor provides full text conversion and it is Python-syntax aware.
Also note that the Code section of a Python node belongs to a node instance, no code is saved anywhere until you do it explicitly, and any change to the code will disappear as soon as you delete that node instance. If you want to keep your changes you need to use the contextual menu -> Save in library to create or update the python node in the workflows library.
Mistika classes
Mistika Workflows exports a number of modules to give access to the system functionality.

This is just an introductory document with few examples, the full reference guide with all Mistika classes is available in the Mistika python extension library.
A first python example: Executing these command lines will create a workflow "my test" with two nodes (a "File" node and a "Prores" node), and it will interconnect both of them.
from Mistika.classes import Cconnector
from Mistika.classes import CbaseItem
w=Mistika.workflows.addWorkflow("my test")
inputNode=w.addNode("File",CbaseItem.NODETYPE_INPUT)
outputNode=w.addNode("ProRes",CbaseItem.NODETYPE_TASK)
inputNode.getFirstConnectorByName("To").link(outputNode.getFirstConnectorByName("VideoIn"))
Note that in this example we have imported the CbaseItem class to have access to predefined constants. The equivalent without this constant is possible but it would be less legible, as it would be something like:
inputNode=w.addNode("File",1)
Later you can access that node from other scripts and other nodes:
w=Mistika.workflows.getWorkflow("my test")
You can also access the active workflow without the need of knowing its name:
wf=Mistika.workflows.getCurrentWorkflow() (gets the current workflow from the active tab)
And now let's get a property of one of its nodes (the color):
n=wf.getNode("File")
print n.color
Interestingly, the python id of a property does not need to match what is shown in the GUI. In this example the property appears as "Color" in the GUI, but its python id is "color" (lowercase). The easiest way to know the python id is to place the pointer on the property name, which in this example will show a tooltip saying "Python id: File.color". (the labels for the GUI are explained later)
Python nodes
A “Python” node can be used at any part of a workflow. It is capable to execute standard Python code, but also with easy access to all the data structures of Mistika Workflows and useful metadata of the media files (most metadata obtained or created by one node is passed between nodes from the input to the output connectors, so that it is accessible across the whole workflow). And the most important functions of the GUI functionality are also available as python predefined classes and functions.
For example, the code contained in just one Python node can not only do things with its input files and metadata, it can also create new workflows with any type of nodes, then send those workflows to the jobs queue and execute them. Basically it can do similar things as a human user could do in the application but programatically. This capability provides a powerful automation tool.
Without python nodes a normal user can still order the mass processing for thousands of files, but this is only practical as long as the processing needs for those files have few variations between them. Meanwhile, using Python nodes is the right way to go beyond those limitations. For example you can use Python to read a complex production spreadsheet and then create hundreds of simultaneous workflows, all different between them and with each one having its own variations and specialties depending on the sheet content.
You can also use Python to create new nodes and add them to the Workflows node library, so once they are operative they can can be made readily available to normal users with no Python knowledge, and also with control about what properties they can see or not in the properties panel (this is explained in next sections)
Now going into detail:
A Python node needs to have at least 3 functions defined (you can load a Tasks->Python node to see an example):
init(self): Code to be executed one time when creating a new node instance. Return True if no error, or False in case of error. Typically used to create the node properties and connectors.
isReady(self): It must return True if the node has everything that it needs to run, or False if not yet. As a difference to the init procedure this function is being evaluated pretty often to refresh any change in the workflow or any changes in node parameters. This is typically used to validate if the node has all what it needs (including connectors), also defining the light indicator of the node (the IsReady state).
As a result of this, in some cases the isReady function can be executed many times per second to refresh the GUI, even with unrelated changes, so you should only include very basic checks on it!. For this reason, If you just want to validate property values when they are changed, a more convenient method is the onPropertyUpdated (explained later)
process(self): The actual code to execute when running the workflow in the job queue. it must return True if no error, False in case of errors.
The self parameter provides the object id to the node. You will need it when creating properties and connectors, read their values, and adding functionality to the node in general.
Example: (a “hello world” node):
#This node will print a message in the Script Editor console
def init(self):
return True
def.isReady(self):
return True
def process(self):
print ('Hello World, my name is '+self.objectName)
return True
If you want to see basic examples, in the node library all the nodes starting with "py" (pyDoNothing, pyHelloWorld, pyPrintInputs etc) are very basic example python nodes, so you can see their code as a reference.
A typical way to create new python nodes them is:
- Load a Python node to use it as an example template
- Rename the node (this is important, use a meaningful name for you)
- Change the code
- Save in library. The SaveInLibrary action (available in the contextual menus of the node and the script editor) will save a file with your current python code under the SGO AppData/shared/workflowsLibrary, which is will make it to appear as a new python node in the nodes library.
Note: By default SaveInLibrary will place the new nodes in the Tasks category of the library, but you can force a node to appear in any other category by using the setSupportedTypes node function. However this function is a bit too advanced at this stage of the introduction, but if you want to see a full example check the Outputs->pyPrintPinputs node and take a look to the init function of its code (it has one line executing setSupportedTypes).
Another important aspect of the process function is that all the nodes of a workflow (their process functions) are always executed, even if the input connectors are empty (not receiving any Universal Path). Note that in many cases the UPs can travel trough alternative branches of the nodegraph only (for example when using alternative outputs of classifier nodes...). So when you build your own python nodes it is important to define what the process method does when not receiving any Universal Path trough the input connectors, because even in that case it will be called anyway.
Changing node state and sending messages to the user trough the validation inspector and render log panels.
Your node can use these commands to send messages to the GUI for user knowledge, both via validation inspector and render log panels, similar to other nodes do:
self.info("msgType","message content" )
self.warning("msgType","message content" )
self.critical("msgType","message content" )
Where msgType is just an internal id name for your own control, you can type anything meaningful for you.
During the execution of the node, those messages are also logged in the SGO Apps/Workflows/Log files. So they can be a useful debugging tool.
The info/warning/critical property control the icons and colors to be displayed with the message. Logically, to keep the node representation coherent the return code from isReady and process should always return false for the case of "critical" messages and true otherwise (as a good practice those methods should never return false without also sending a critical message to explain the reason to the user). Note that returning false from the isReady procedure will also prevent the workflow execution, which is useful to prevent mistakes and to inform the user that the node is not ready for execution yet.
Note: You can get the current status of a node (and status icon) by reading its colorByStatus property, which is set to True or False depending on the isReady() return value.
Adding new Python nodes to the workflows library and managing their properties in the GUI.
Adding a new user node to the nodes library.
You can add new python nodes to the nodes library, and they will appear in the task section of the Finder panel and other places, as if they were any other original nodes coming with the application. To do that, you can place the node code in the Script Editor and use its contextual menu option Save in Library. It will ask a name for it and the new node will appear in the Finder panel. Alternatively, you can also do it manually: Just put your python code into a text file with ".py" extension, and place it in this folder:
SGO AppData/shared/workflowsLibrary/nodeName.py
This method will load the node the next time you open Mistika Workflows, while using the Save in Library method in the contextual menu of a node works immediately, without the need to reload the application.
Note: That is just the default location for the shared folder. When using multiple computers (or multiple Mistika products) you may prefer to copy the shared folder to a shared storage (hence its name), . The Mistika "shared" folder not only permits to share your nodes library but also other important assets like Mistika the display_filters folder (for the Mistika predefined effects), LUTs, and in general other Mistika files independent from the local system. The Mistika paths structure is explained here.
Removing a user node from the nodes library.
To remove a user node, just delete it from the library folder (and restart the application to reload the library): SGO AppData/shared/workflowsLibrary
Testing python code in the script editor, with autofiller support
In a python node the self variable containing the node id. is given to your code, it is not a variable that you need to define. But sometimes you may want to test some code from the node directly in the script editor, or use it with the autofiller to write code. The command line and the script editor are in the same python context, but they are not connected to any node (self is not defined). To solve this, a simple way is to create a node and then define the self variable, by executing this in the command line:
from Mistika import workflows
w=workflows.getCurrentWorkflow()
self=w.getNode("YourNodeName")
In that way, from this point the autofiller will also work with the self variable in the command line and script editor, and you can execute code in there.
Creating properties and controlling their visibility in the Properties panel:
Your Python nodes can have any number of properties. Some of them will come predefined, but you can create as many as you want in the init procedure. Example:
def init(self):
self.addProperty("myProperty1", "this is my default value")
return True
And then use it in the rest of your code. Example:
self.myProperty1="hello"
The property values will be stored in the node instance until deleting it.
In the previous example a property myProperty1 was created, but it will not be visible to the user yet. You can control which properties appear in the properties panel, and also hide other properties that you don't want normal users to see (like the python Code property for example). To do that, each node have a .xsd definition file in "SGO AppData/shared/config/schemas" , with the same name as your python node and .xsd extension:
SGO AppData/shared/config/schemas/nodeName.xsd
The first time that you use the node a default xsd file will be automatically for it, with no properties visible (only default properties, objectName and color).
Note that the python nodes come with some predefined properties (like the color) which may or may not be visible in the default xsd.
You can edit the .xsd files manually (which is recommended for simple cases, for example by using the xsd of other nodes as a reference), but an specialized tool is also available in the Window->Panels->Properties editor for more complicated cases.

This tool is only for very complicated cases with many properties, so you should not need it at the beginning. So we will only provide a brief introduction: In this tool first you have to select your new node in the Base Item Selector. Then drag and drop properties from the Base item view to the Designer area to make them visible, You can also create groups, drag & drop properties between them etc. The widgets functionality follows the Qt standard which is not documented here, but there is plenty of documentation on Internet. We recommend to use existing nodes as a reference to learn the possibilities. But just remember that anything you do with this tool should match the node properties already in your Python code, otherwise it will not work or it will produce erratic behavior.
Basic properties are strings and boolean (shown as checkmarks ). But the properties panel can also offer combo boxes to the user to select values from a list. For example, for a property called "time" you could have this line in the xsd file of the node:
<xsd:element name="myTime" type="integerPulldown" sgo:integerPulldownValues="One second$$$1|One minute$$$60|One hour$$$3600" sgo:visibility="0" sgo:sortOrder="10"/>
Which will offer the 3 possibilities to the user (One second, One minute, One hour) and will set the property "time" to the corresponding integer ( 1, 60, 3600 ).
You can also get the values offered in the combo box from a different property, for cases where value content depends on executing some other code. For example you could define these properties:
self.addProperty("bet")
self.addProperty("_championsLeagueFinalists")
_championsLeagueFinalists=["Real Madrid", "Chelsea"]
And then have this line in the xsd file:
<xsd:element name="bet" type="stringPulldown" sgo:actionType="getDataFromProperty" sgo:actionTypeProperties="_championsLeagueFinalists" sgo:visibility="0" sgo:sortOrder="10"/>
The python id of a property does not need to match what is shown in the GUI via the xsd file. Remember that the easiest way to know the python id of a property is to select the node in the GUI and place the pointer on the property name. This action will show a tooltip with the python id after a second or so.
If you need to obfuscate a property (like when requesting a password) you can use the addEncryptedProperty function. Check the Mail task node for an usage example.
Changing property visibility dynamically
Once a property is already in the xsd file (and not before), then you can use this method to make it temporally invisible, for example to make it appear depending on the values of other properties.
self.setPropertyVisible("propertyName",False)
And then set it back to True to make it visible again.
Reacting to property updates
When the value of a user defined property changes (either by a user action or programmatically) the isReady function is invoked. So that function was a traditional place for checking property changes and to react accordingly.
However, since recent versions there is a more convenient way to do this, by implementing the function:
onPropertyUpdated(self, name)
This method is recommended for more legible code, and specially because it is only executed when a property changes, while isReady is invoked much more often on any type of change (even a simple click on the node can be enough to trigger isReady several times..).
Note: Please pay attention to remember this point because you will still find the old method on most of the code examples. They were made before this function was available, so it is easy to forget.
Example: Whenever the user (or a python command) changes the "country" property of this node, it will force the first character to be uppercase.
def init(self):
self.addProperty("country")
return True
def isReady(self):
#Check here if the node is ready to be processed
return True
def onPropertyUpdated(self, name):
if name == "country":
self.country=self.country.capitalize()
print "Country changed: self.country: "+self.country
def process(self):
#Do your processing here
return True
You can find an usage example in the code of the Classify By Extension node, where it is used to re-invoke the init function to add and remove connectors on the fly.
Creating persistent variables
When deleting a python node all its python variables are destroyed with it. If you need to keep persistent variables accesible across your workflows (and you do not want to store them in files) then you can use different techniques , for example:
1- Using custom metadata tokens. You can add your own metadata tokens to this file:
SGO AppData/shared/config/NameConventionPlaceHolders.xml
Then you can use pyhton nodes to populate their values, being a good example the NC to metadata node (use its python code as a reference).
This method is recommended when you need to keep the value across a workflow execution.
2- Another method is by using environment variables of the operating system:
import os
os.environ["MY_VARIABLE"]="my_value"
This method is recommended when you need to keep the value during a whole Mistika Workflows session. However they only work for simple strings, for more complicated structures that you want to be persistent it is recommended to store them in files.
3- Reading and writing variables to your own metadata files. Required to keep metadata between sessions, even surviving to potential crashes.
Adding drag&drop capability to a property
Python nodes support drag&drop, to drop files or folders from external file browsers. First you need to tell which property will receive the drag&drop actions with setDropToProperty:
self.addProperty("myProperty1")
self.setDropToProperty("myProperty1")
You can also declare a list of acceptable file specs.:
setDropSupportedFileMasks (["*.dpx","*.jpg"])
Optionally, you can define a processDroppedFile method to be invoked during drag&drop actions, and it will be passed the dropped path as parameter:
setDropSupportedFileMasks (["*_LEFT_*", "*_RIGHT_*" ])
def processDroppedFile(self, path)
#This example gets the drag&drop of one eye and it loads the second eye
oneEye=str(path)
self.rightEyeProperty=oneEye.replace("_LEFT_","_RIGHT_")
self.leftEyeProperty=oneEye.replace("_RIGHT_","_LEFT_")
Adding workflows to the task queue and executing them from within a script.
Your python scripts have access to a task global variable to control the task queue and its execution. For example this script will create a workflow and it will add it to the task queue:
import Mistika
from Mistika import workflows
from Mistika.classes import CbaseItem
w=Mistika.workflows.addWorkflow("MyWorkflow")
tasks.addWorkflow(w)
To execute all workflows, you can use this:
tasks.runAllTasks()
The above case is just illustrative, but there is a simpler way to do just that in common cases: if what you want is to execute Mistika workflows, load a workflows file (.mwf), and execute all its workflows in the queue you just need a simple command line to be executed on your operating system. Examples:
Windows: "PathToWorkflowsExecutble\workflows.exe" -A "C:\Path\To\Workflows\File.mwf"
Linux, Mac: "PathToWorkflowsExecutble/workflows" -A "/Path/To/Workflows/File.mwf"
Working with universal paths and node connectors
The node connectors communicate by sending universal paths. As a difference to a standard file path the universal paths permit to include extra metadata parameters, typically used to pass composite media packs (such as an enumerated file sequence or other composites made of multiple files) and additional metadata.
This example creates a Task with one input and one output. On execution, this example just sends the input (if any) to the output. This example does not process the input file.
from Mistika.classes import Cconnector
def init(self):
self.addConnector("input",Cconnector.CONNECTOR_TYPE_INPUT,Cconnector.MODE_OPTIONAL)
self.addConnector("output",Cconnector.CONNECTOR_TYPE_OUTPUT,Cconnector.MODE_OPTIONAL)
return True
def isReady(self):
return True
def process(self):
input=self.getFirstConnectorByName("input")
output=self.getFirstConnectorByName("output")
output.setUniversalPaths(input.getUniversalPaths())
return True
Connectors can create universal path objects, work with them and then pass them to outgoing connectors. Example:
p=CuniversalPath(self.getName Convention())
p.setPath("C:/My/Path/to/CarCatalog")
p.setParam("car", "BMW 325i")
out=self.getFirstConnectorByName("output")
out.clearUniversalPaths()
out.addUniversalPath(p)
Example: During node execution, read incoming universal paths from all connectors:
for c in self.getConnectors():
for p in c.getUniversalPaths():
print "Full universal path: ", p.toString()
model=str(p.getParam("car",""))
catalog=str(p.getParam("root",""))
print "Catalog: ", catalog, "Model: ", model
The nodes are responsible to clear their output values when needed, (typically at the end of the execution). Otherwise the output values are kept until they are replaced in a new execution, which can be dangerous if your node does not replace them (for example when used in bypass mode). You can clear all the outputs by adding this function at the end of the process function:
out.clearUniversalPaths()
A very useful node for debugging is the pyPrintInputs. You can connect any number of outputs to the inputs of this node and it will simply print their content in the script editor.
Python nodes can have a variable number of connectors (a good example is the pyPrintInputs mentioned above), which can be dynamically added by the user (via drag & drop actions) or by using python commands. This is controlled by the setAcceptConnectors property. The following usage example is from the Classify By Extension node, which admits a variable number of input connectors and will send the input files to different outputs depending on their file type:
from Mistika.Qt import QColor
from Mistika.classes import Cconnector
def init(self):
# creating properties
self.addProperty("errorMode",0)
self.addProperty("extensions","mov,mxf,mp4,j2k,r3d,rnd")
#creating connectors
self.addConnector("files",Cconnector.CONNECTOR_TYPE_INPUT,Cconnector.MODE_REQUIRED)
extList=self.extensions.split(",")
for ext in extList:
self.addConnector(ext.strip(),Cconnector.CONNECTOR_TYPE_OUTPUT,Cconnector.MODE_OPTIONAL)
self.setAcceptConnectors(True,"files")
#configuring the node
self.bypassSupported=True
self.color=QColor(0,180,180)
return True
def isReady(self):
res=True
if int(self.errorMode)<0 or int(self.errorMode)>3:
res=self.critical("filesSplitter:isReady",u"Invalid errorMode {}".format(self.errorMode),"errorMode") and res
return res
def process(self):
#And finally, Do the thing here!
res=True
inputs=self.getConnectorsByType(Cconnector.CONNECTOR_TYPE_INPUT)
outputs=self.getConnectorsByType(Cconnector.CONNECTOR_TYPE_OUTPUT)
for c in outputs:
c.clearUniversalPaths()
if self.Bypass:
return True
for c in inputs:
for up in c.getUniversalPaths():
ext=up.getExtension().lower()
out=self.getFirstConnectorByType(Cconnector.CONNECTOR_TYPE_OUTPUT,ext)
if out:
self.info("filesClassifier:process:info",u"sending {} to {}".format(up.getFileName(),ext),"")
out.addUniversalPath(up)
else:
func=[None,self.info,self.warning,self.critical][int(self.errorMode)]
if func:
res=func("filesClassifier:process:ext",u"Extension not supported {}".format(ext),"") and res
return res
def onPropertyUpdated(self,name):
if name=="extensions":
init(self)
When your code needs to interconnect nodes with a variable number connectors you can use the dropConnector function, which simulates the user action of dropping a connector from another node (without the need to take care of connector position details).
Bypass support
Many nodes support the bypass mode (a little eye icon on the node), and you can also implement it for your python nodes via the self.bypassSupported property (as in the previous example). The typical usage is to let the user to bypass the node for testing purposes temporally, without having to disconnect and reconnect it from the other nodes.
In this mode, normally you will want your node to return without any action, but you may want to pass the inputs to the outputs or to implement any custom behavior. It really depends on what your node does in the workflow.
If you want to support bypass you need to it explicitly, as follows:
- In the init function, set the bypassSupported property as True. That will show the bypass icon in the node.
self.bypassSupported=True
- In the process function, manage the bypass as preferred. Example:
if self.Bypass:
#do your actions for bypass mode
return True
And make sure the Bypass property appears in the .xsd file of the node (they are stored in the SGO AppData/shared/config/schemas folder), which should have a line like this:
<xsd:element name="Bypass" type="xsd:boolean" sgo:visibility="0" sgo:sortOrder="2"/>
Name convention property
Your node comes with a predefined property Name Convention containing the default naming syntax, you can access its current value (or change it).
Example:
print self.Name Convention
Code injection
You can inject python code into a text variable or a property and have it executed at evaluation time, by using this syntax:
<? Your python code ?>
For example, if you want to send an email with a listing of the input files you could put something like this in a property:
myInjectedCode="""Hello guys, these are the list of files that I have received:
<?py
for c in self.getConnectors():
for p in c.getUniversalPaths():
print p.getFilePath()
?>
Best Regards,
The Workflows team"""
Which can be evaluated at execution time by putting something like this in the process function:
body=self.evaluate(self.myInjectedCode)
Typical usage is when you want to easily compose text with procedural data, or when you want to inject code into another node (by populating one of its properties and letting that node to evaluate it later)
See the mail node example for a typical usage example
Reading metadata from media files
Mistika Workflows provides a lot of specialized nodes to work with the metadata embedded in your media files, so normally you shouldn't need to do this. But it is also possible to get direct access to all the metadata that Mistika can get from those files via the getMetadata function. For example you could put something like this inside the process function of your node, to print all the media metadata of the incoming files:
for c in self.getConnectors():
for p in c.getUniversalPaths():
p.readMetadataFromFile()
print p.getMetadata()
And this is the (unformatted) output of that code for one example file (in this case an r3d file):
rankFrom :
files :
files_ 1 :
A001_C025_031572_001.R3D
{u'Codec': u'', u'Fps': 23.976024627685547, u'Aspect Ratio': u'2.37', u'r3d raw': {u'Lgg Red': u'Lift 0, Gamma 1, Gain 1', u'Drx': 0.0, u'Saturation': 1.0, u'Tint': 23.0, u'Brightness': 0.0, u'camera_model': u'EPIC-M', u'Kelvin': 3575.0, u'Lgg Green': u'Lift 0, Gamma 1, Gain 1', u'gammaValue': 10, u'gamutValue': 6, u'Gain R': 1.0, u'Flut': 0.0, u'Version': 2, u'Contrast': 0.0, u'camera_id': u'A', u'Gain G': 1.0, u'Lgg Blue': u'Lift 0, Gamma 1, Gain 1', u'camera_pin': u'102-4C6-8B5', u'Gain B': 1.0, u'Exposure Compensation': 0.0, u'Shadow': 0.0}, u'Format': u'RGBA64', u'Settings': {u'iSO': 800L, u'whiteBalance': 3575.0}, u'Time Code': u'1399326@23.976025|1399326@23.976025|110703@23.976025', u'Resolution X': 5120, u'Resolution Y': 2160, u'Path': u'l:/REALTIME_STORAGE/RED/RED_EPIC_5K/A001_C025_031572.RDC', u'Name': u'A001_C025_031572_001.R3D', u'Uni Color': {u'gamut': u'REDcolor2', u'colorSource': u'redColor', u'gamma': u'REDgamma2'}, u'Created': QDateTime (2017-09-09T23:43:33, at: 0x000000002046A7A0), u'Modified': QDateTime (2011-03-16T01:34:14, at: 0x000000002046A5D0), u'Resolution': u'5120X2160', u'reel_id_full': u'A001_C025_031572', u'reel_id_8_character': u'A001C025', u'reel_id': u'001', u'Camera': {u'cameraSerialNr': u'102-4C6-8B5', u'cameraDeviceID': u'A', u'cameraModel': u'EPIC-M'}, u'Frames': 511, u'tapeName': u'A001_C025_031572_001.R3D', u'Size': 3003908096L}
External CLI interface
Starting Workflows with a .mwf file and executing it automatically ( -A & -r parameters)
You can execute workflows by command line. The -A parameter will load a .mwf file, then it will send all its workflows (the ones that are in "ready" state) to the queue and then it will start their execution, similar to what a human operator will do. The interface will remain open so that you can monitor their progress. Example (on windows):
workflows -A “C:\MyPath\MyWorfkflows.mwf”
For example you can add that command line to the task scheduler of your operating system to restart your workflows automatically if the application crashes or if the session disconnected (login/logout cycles), for systems running unattended sessions. This link provides an example on Windows, but unix systems also have similar procedures.
Alternatively, the -r parameter will do the same, but it will force Mistika Workflows to exit after the initial execution. This prevents multiple instances of Workflows to stay "zombie" after their command line executions if they are not expected to do anything else.
Example (on windows):
workflows -r “C:\MyPath\MyWorfkflows.mwf”
Finally, you can also use the -r parameter to render .rnd render jobs created by encoder nodes (for example when creating them with the Write RND Only property activated).
workflows -r “C:\MyPath\SGO Data\Projects\PDEFAULT\DATA\RENDER\WORKFLOWS\MyClipName.rnd”
Changing property values from the command line
Remember that you can also change the value of any property of any node from the command line, by using the special node consolerArgsToProperties.
Quiet mode with -q
The appearance of the interactive GUI is always optional: it will appear by default, but it can be hidden with the “-q” parameter (quiet mode).
workflows -q -R “Path/To/Python/Script.py”
Starting Workflows and passing a python script to it with -R
The Mistika Workflows executable can be passed something like “-R MyScript.py” parameter to open the application and then run a Python script automatically. The Mistika python classes provide access to most of the Workflows functionality, so you can use python scripts for additional automation and integration with other applications:
workflows -R “/Path/To/PythonScript.py”
Note: requires forward slashes "/" notation, even on Windows
Once the script is executed the Mistika Workflows application will stay running (so the user can interact with it). This is the default behavior, but you can change it as follows:
if the application is executed in quiet mode (or if you want it to exit at the end of the script execution) then you need to add a Mistika.workflows.quit() command at the end of the script. Otherwise Mistika Workflows will not realize when the script is finished and needs to exit, so the application will seem to be frozen forever, also blocking system RAM unnecessarily. A typical external script looks like this:
import Mistika
...script content...
Mistika.workflows.quit()
After executing the script, you can get the render log in this file (it will have the same output as if you execute it in interactive mode, with all the info/warning/critical messages triggered by the python node): SGO AppData/Workflows/log/workflowsRender.log
Your external script can create and execute a workflow or the whole workflows queue as said:
tasks.runAllTasks()
But if you are using a external script then it is important to note that the render tasks will be executed in the background. That means that your script can (and will) continue executing while the render is happening and also after that. This level of control can be very useful but it is important to not let your script to reach the final Mistika.workflows.quit() command before the render is finished. For example, you can use the class CrenderTask, which provides an isCompleted method to check the execution state, or alternatively implement a reasonable timeout.
Executing workflows on external renderfarms
In principle (without a renderfarm) all nodes in a workflow are executed in serial manner, so no node will start until the previous has finished (and this is not different for pythin nodes). The same happens with the workflows in the queue, no parallel execution is possible within Workflows (or not without opening several Workflows applications at the same time).
The main reason for this is because most complex nodes (decoders, encoders, display filters...) will use the GPU of the system very intensively, and overloading it can cause much slower global performance and stability issues (Mistika Workflows can not control multiple GPUs directly)
However, at the date of this document it is being integrated with 3rd party renderfarm management products such as Smedge & Deadline10 via connectivity plugins. This subject is out of the scope of this introduction, so we will only mention briefly:
By using multiple render nodes with those products it is possible to scale up the productivity up to any performance target. Two types of renderfarm buttons are provided:
- Renderfarm icon on renderfarm capable nodes: Activate it to render that single node in parallel (for example, a single transcoding node can be split into multiple render jobs, thus using many computers at the same time by rendering a packet of frames on each computer)
- Renderfarm icon on the queue panel: To submit each workflow as a separate render job, so that each whole workflow is sent to a different render node.
Logically each render node requires to have Mistika Workflows pre-installed before using this feature (the render manager just communicates with them). And a 3rd party render manager (Uberware Smedge or Deadline, which you can choose in the File->Preferences->Renderfarm menu) needs to be already running, as they are responsible for executing the jobs on each render node.
An introductory video using Deadline is available here.
Installing additional Python modules
Any python modules installed in the system will be readily available to Mistika Workflows. (Currently Python 3.11 compatible modules are required.
Mistika Workflows stores the path to the python software in the MISTIKA_PYTHON environment variable. For example, if you want to find the python software that it is using type this in the command line:
import os
print os.environ["MISTIKA_PYTHON"]
You can install python modules from within Mistika Workflows or from a external tool, as you prefer.
Installing a python module from within Mistika Workflows (for example within a python node). RECOMMENDED:
First download the module to your local disk (make sure to download a version that is compatible with python3.11), Then execute this in Workflows:
import mistikaTools
mistikaTools.installModule("PathToModuleFile")
Note: In the particular case of linux you need to have defined an environment variable before you can install additional python modules, which depends on each linux version. For example:
MISTIKA_PYTHON="/usr/lib64/python3.11"
And these linux packages needs to be installed: libcurl-devel and python-devel. For example:
sudo yum install libcurl-devel
sudo yum install python-devel
It is recommended to execute the above steps before installing Mistika Workflows, otherwise the installer may fail to install several important modules coming with it.
More details about the linux installation in this article.
Installing a python module from the outside of Mistika Workflows
Windows:
c:\python311\python.exe -m ensurepip (first time only)
c:\python311\python.exe -m pip install PathToModuleFile
Mac:
sudo python -m ensurepip
sudo python -m pip install PathToModuleFile
Linux:
pip3.11 install PathToModuleFile
Please note that for the "PathToModuleFile" the generic module name is not enough, it needs to be a version compatible with python 3.11. Otherwise Python will try to find the latest one available, which may not work for Python 3.11 (the current python version used by Mistika Workflows).
Mistika Workflows will also install some python modules by default. As a reference, the installed modules come in this folder:
SGO Apps/Mistika Workflows/pyModules
Forum: Mistika Workflows Python scripts
A good source of python node examples is the SGO AppData/shared/workflowsLibrary folder, which contains the source code of all the Python nodes that are part of the nodes library.
In addition, these are some examples from the python scripting forum:
Example 1: Creating a Python node listing the files in a given folder.
This node provides a "folder" input connector where you can connect a folder node. When it is executed, it will print the list of files in the folder
import Mistika
from Mistika.classes import Cconnector
def init(self):
self.addConnector("folder",Cconnector.CONNECTOR_TYPE_INPUT,Cconnector.MODE_REQUIRED)
def isReady(self):
return True
def process(self):
for c in self.getConnectors():
for p in c.getUniversalPaths():
print p.getFilePath()
return True
Example 2. Creating a "myCopy" node with an added property visible in the GUI.
This node just copies the input to the path defined in the property dstFile and sends it to the output for the next node.
from shutil import copyfile
def init(self): # initialization function to create in/out connectors and properties (attributes)
self.addConnector("in",1,1) # 1=input. 1=mandatory
self.addConnector("out",2,0) # 2=output. 0=optional
self.addProperty('dstFile')
return True # successful initialization
def isReady(self): # check if the node can be processed. in this example, dstFile needs to be defined
if self.dstFile!='':
return self.critical('myErrorID','dstFile can not be empty')
return True
def process(self): #copy in file to dst File and set output connector)
input=self.getFirstConnectorByName("in")
output=self.getFirstConnectorByName("out")
copyfile(input.url(),self.dstFile)
output.setUrl(self.dstFile)
return True # performed ok (no error management in this example)
In order to make it work correctly, you will need to create an schema file for the node properties. it should be in "SGO AppData/shared/config/schemas" and it should be something like this: (myCopy.xsd)
Note: This example is just a copy of python.xsd but adding the “dstFile” property:
<xsd:schema xmlns:sgo="http://www.sgo.es/2017/sgo.xsd"
xmlns:xsd="http://www.w3.org/2001/XMLSchema">
<xsd:element sgo:categoryType="categoryCollapsible" name="Python" sgo:visibility="0" sgo:sortOrder="0">
<xsd:complexType>
<xsd:sequence>
<xsd:element name="objectName" type="xsd:string" sgo:visibility="0" sgo:sortOrder="0"/>
<xsd:element name="color" type="color" sgo:visibility="0" sgo:sortOrder="1"/>
<xsd:element name="dstFile" type="universalPath" sgo:visibility="0" sgo:sortOrder="2" sgo:properties="pathNameFilters('All Files (*.*)')"/>
<xsd:element name="schemaName" type="xsd:anyURI" sgo:visibility="0" sgo:sortOrder="3" sgo:properties="pathNameFilters('xsd Files (*.xsd)')"/>
<xsd:element name="code" type="textEditor" sgo:visibility="0" sgo:sortOrder="4"/>
</xsd:sequence>
</xsd:complexType>
</xsd:element>
</xsd:schema>
If you want to remove the code and some schema details (once the node is finished and well tested) you can also remove default lines, in the next example we have removed the source code and the scheme file, to keep it out of sight for normal users:
<xsd:schema xmlns:sgo="http://www.sgo.es/2017/sgo.xsd"
xmlns:xsd="http://www.w3.org/2001/XMLSchema">
<xsd:element sgo:categoryType="categoryCollapsible" name="Python" sgo:visibility="0" sgo:sortOrder="0">
<xsd:complexType>
<xsd:sequence>
<xsd:element name="objectName" type="xsd:string" sgo:visibility="0" sgo:sortOrder="0"/>
<xsd:element name="color" type="color" sgo:visibility="0" sgo:sortOrder="1"/>
<xsd:element name="dstFile" type="universalPath" sgo:visibility="0" sgo:sortOrder="2" sgo:properties="pathNameFilters('All Files (*.*)')"/>
</xsd:sequence>
</xsd:complexType>
</xsd:element>
</xsd:schema>
Example 3. The "mail" node. Send emails, while passing the input paths to the message body.
Python scripts are normally located in the Code property of a python node. But sometimes, as part of the workflow you may want to execute python code coming from elsewhere. The mail node provides an example by using python code embedded in a property value (the body property of an email)
Note: This node is in the nodes library, this is just a copy of its code:
from Mistika.classes import Cconnector
from Mistika.Qt import QColor
mailModulesLoaded=False
try:
import sys
import smtplib
import re
from email.mime.text import MIMEText
from email.mime.multipart import MIMEMultipart
mailModulesLoaded=True
except ImportError,e:
print "Unable to import modules: "+e.message
print "check your sys.path "
_WF_MAIL_DEFAULT_MSG="""Put your text here
List of Input Files:
<?py
for c in self.getConnectors():
for p in c.getUniversalPaths():
print p.toString()
?>"""
def init(self):
self.color=QColor(225,225,210)
self.addConnector("input",Cconnector.CONNECTOR_TYPE_INPUT,Cconnector.MODE_OPTIONAL)
self.addProperty("login")
self.addEncryptedProperty("pwd")
self.addProperty("smtpServer","smtp.gmail.com")
self.addProperty("port",587)
self.addProperty("to")
self.addProperty("subject","Mistika Workflows Mail Node Processed")
self.addProperty("body",_WF_MAIL_DEFAULT_MSG)
return True
def isReady(self):
res=True
if not mailModulesLoaded:
res=self.critical("mail:modules","Modules not loaded. Check your sys.path or install them")
# if self.login=="":
# res=self.critical("mail:loginEmpty","'Login' can not be empty") and res
if re.match('^([a-zA-Z0-9_\-\.]+)@([a-zA-Z0-9_\-\.]+)\.([a-zA-Z]{2,20})$',self.to) == None:
res=self.critical("mail:invalidTo","Invalid email address: "+self.to) and res
if self.to=="":
res=self.critical("mail:toEmpty","'To' can not be empty") and res
return res
def process(self):
try:
s = smtplib.SMTP(self.smtpServer,int(self.port))
s.starttls()
s.ehlo()
if self.login!="":
s.login(self.login,self.pwd)
msg = MIMEMultipart()
msg['Subject']=self.subject
msg['From']=self.login
msg['To']=self.to
body=self.evaluate(self.body)
msg.attach(MIMEText(body.encode("utf8"),'plain'))
s.sendmail(self.login,self.to,msg.as_string())
s.quit()
except Exception,e:
return self.critical("process::smtp","smtp Error: {}".format(e))
return True
As you can see, when the mail node is initialized it will create a body property with some python content in line
Put Yout Text Here
List of input Files:
<?py
for c in self.getConnectors():
for p in c.getUniversalPaths():
print p.getFilePath()
?>
Which will be evaluated at execution time by this line of the script:
body=self.evaluate(self.body)
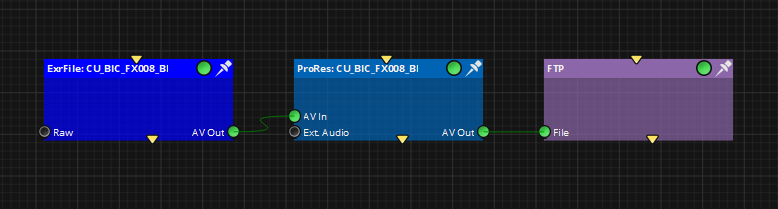
Example 4a: Creating whole workflows from python scripts, also controlling the node positions.
Tthis example will create a workflow looking like this:
Code:
# imports used in the example
import Mistika
from Mistika.classes import CbaseItem
from Mistika.classes import Cconnector
from Mistika.QtCore import QPointF
#create the example workflow
#wf=Mistika.workflows.addWorkflow("My Test") # creates a workflow
file=wf.importFile("G:/MATERIAL/formatos/EXR/CU_BIC_FX008_BICHA_V3_0035.exr",True) #automatically create a node from a file (the node created depends on the file type (It is similar to droping a file into the workflow editor. The second parameter says if the file comes from a sequence
file.pos=QPointF(0,0)
prores=wf.addNode("ProRes",CbaseItem.NODETYPE_TASK) # add a prores file (From the Tasks group. this helps to diferenciate nodes that appear in more than one group (such us FTP)
prores.pos=QPointF(300,0) # reposition the prores node 300 pixels to the right of the default position (just for clarity, to avoid nodes appearing on top of each other)
ftp=wf.addNode("FTP",CbaseItem.NODETYPE_OUTPUT) # add an ftp output node
ftp.pos=QPointF(600,0) # reposition the prores node (just for clarity)
file.getFirstConnectorByName("VideoOut").link(prores.getFirstConnectorByName("VideoIn")) # connect file->prores
prores.getFirstConnectorByName("VideoOut").link(ftp.getFirstConnectorByName("File")) # connect prores->ftp
#populate node properties
file.gamma="Linear" # define source color space
file.gamut="ACES (AP1)"
prores.colorSpace="Rec2020" # define destination Color Space
prores.resolution="HD 1080 (1920x1080)" # define destination resolution
prores.displayFilter="watermark" # set a display filter called watermark
ftp.url="ftp://ftp.sgo.es/" # set the destination ftp address
Example 4b: Adding menus to the Mistika Workflows GUI for launching custom python scripts
You can add your own menus to the Workflows GUI. Once you have the kind a python script like the one above, you can add a GUI menu button for launching it, by using the following steps:
1.- Write the script in your own myExample.py file There is a default location in SGO AppData/shared/scripts but you can write the script in any other directory
2.- Add it to the menu using the the bindPyFile command:
i.e. lets suppose my py script is "c:/tmp/myExample/py"example
and I want to create a command called "My Example" in the "menu bar->My Scripts" submenu
I can use the following command:
Mistika.app.bindPyFile("menuBar->My Scripts","My Example","c:/tmp/myExample/py",10)
If "My Scripts" menu does not exist. it will be created as well.
The number 10 represents the load priority, and it can be used to order the items in the menu (from lower to higher values )
This command will create a bind in the "SGO AppData/workflows/codeBinds" folder linking the menu and the created py file.
to delete the menu, delete the bind file from that folder (the change is applied the next time the sw starts)
Example 5: Creating workflows from another python workflow
This example is the same as the previous one. But this time, we will create the workflow during the execution of another workflow within a python node.
Please Note you will need Wf Version 10.4.1 or later to execute this code
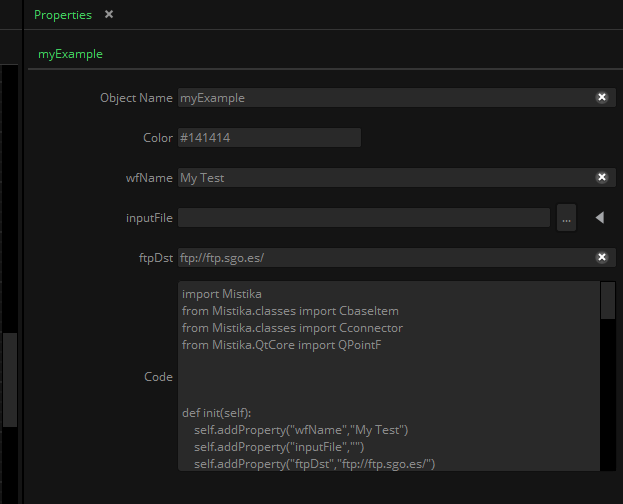
The behaviour will be very silimar to the previous example, but in this case, 3 properties are added to the node to parametrize them;
•wfName: to store the name to use when creating the new workflows
•inputFile: to set the input file path
•ftpDst: to set the final ftp destination
the node will also check that the inputFile exists before allowing you to execute the workflow
So, with those changes, the python node would look like this:
import Mistika
from Mistika.classes import CbaseItem
from Mistika.classes import Cconnector
from Mistika.QtCore import QPointF
def init(self):
self.addProperty("wfName","My Test")
self.addProperty("inputFile","G:/MATERIAL/formatos/EXR/CU_BIC_FX008_BICHA_V3_0035.exr")
self.addProperty("ftpDst","ftp://ftp.sgo.es/")
return True
def isReady(self):
if len(self.inputFile)==0: #no empty file supported
return self.critical("myTest:isReady:len","input file can not be empty")
return True
def process(self):
#create the example workflow
wf=Mistika.workflows.addWorkflow(self.wfName) # creates a workflow
file=wf.importFile(self.inputFile,True) #automatically create a node from a file (the node created depends on the file type (It is similar to droping a file into the workflow editor. The second parameter says if the file comes from a sequence
print file
file.pos=QPointF(0,0)
prores=wf.addNode("ProRes",CbaseItem.NODETYPE_TASK) # add a prores file (From the Tasks group. this helps to diferenciate nodes that appear in more than one group (such us FTP)
print prores
prores.pos=QPointF(300,0) # reposition the prores node (just for clarity)
ftp=wf.addNode("FTP",CbaseItem.NODETYPE_OUTPUT) # add an ftp output node
print ftp
ftp.pos=QPointF(600,0) # reposition the prores node (just for clarity)
file.getFirstConnectorByName("VideoOut").link(prores.getFirstConnectorByName("VideoIn")) # connect the nodes
prores.getFirstConnectorByName("VideoOut").link(ftp.getFirstConnectorByName("File")) # connect the nodes
#populate node properties
file.gamma="Linear" # define source color space
file.gamut="ACES (AP1)"
prores.colorSpace="Rec2020" # define destination Color Space
prores.resolution="HD 1080 (1920x1080)" # define destination resolution
prores.displayFilter="watermark" # set a display filter called watermark
ftp.url=self.ftpDst # set the destination ftp address
wf.giveBackAffinity() # this function will be needed in versions >= 10.4.0 to give the management of the created workflow back to the system
return True
To create the node with the code above you can paste the node in the script editor, and using Right Mouse Button->Save In ibrary,
and call it "myExample". that will create a myExample.py in the SGOAppData/shared/workflowsLibrary directory and a myexample.xsd in the SGOAppData/shared/config/schemas directory.
the myexample.xsd needs to be edited in order to add the properties defined in the python script.
here you have an example of a myexample.xsd file with the properties added
<xsd:schema xmlns:sgo="http://www.sgo.es/2017/sgo.xsd"
xmlns:xsd="http://www.w3.org/2001/XMLSchema">
<xsd:element sgo:categoryType="categoryCollapsible" name="myExample" sgo:visibility="0" sgo:sortOrder="0">
<xsd:complexType>
<xsd:sequence>
<xsd:element name="objectName" type="xsd:string" sgo:visibility="0" sgo:sortOrder="0"/>
<xsd:element name="color" type="color" sgo:visibility="0" sgo:sortOrder="1"/>
<xsd:element name="wfName" type="xsd:string" sgo:visibility="0" sgo:sortOrder="10"/>
<xsd:element name="inputFile" type="universalPath" sgo:properties="readOnly|urlVisibleButtonBrowser|pathNameFilters('All Files (*.*)')|fileDialogWindowTitle('Select a File')" sgo:visibility="0" sgo:sortOrder="11"/>
<xsd:element name="ftpDst" type="xsd:string" sgo:visibility="0" sgo:sortOrder="12"/>
<xsd:element name="code" type="textEditor" sgo:visibility="0" sgo:sortOrder="51"/>
</xsd:sequence>
</xsd:complexType>
</xsd:element>
</xsd:schema>
As soon as you write this xsd file in the schemas folder you will see the new properties appearing in the properties editor, like this: